How to apply microcement on old tiles: step by step
Elmicrocementoes el mejor revestimiento decorativo para renovar los azulejos antiguos por ser un material de gran adherencia y, sobre todo, porque permite reformar y recubrir los azulejos de manera rápida y sin obras.
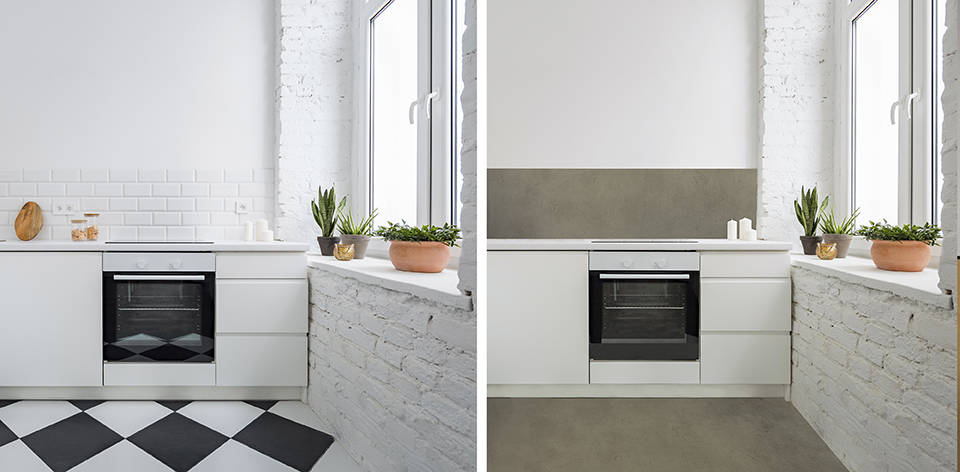
An added value that not all market coatings offer and that have skyrocketed the use of smoothed microcement over bathroom and kitchen tiles. One of the most demanded decorative solutions in recent years by both individuals and professionals from decoration and construction companies.
In this article, we will address the main advantages of using microcement as a continuous coating to renovate tiles as well as the most important tips for successfully applying smoothed microcement over tiles.
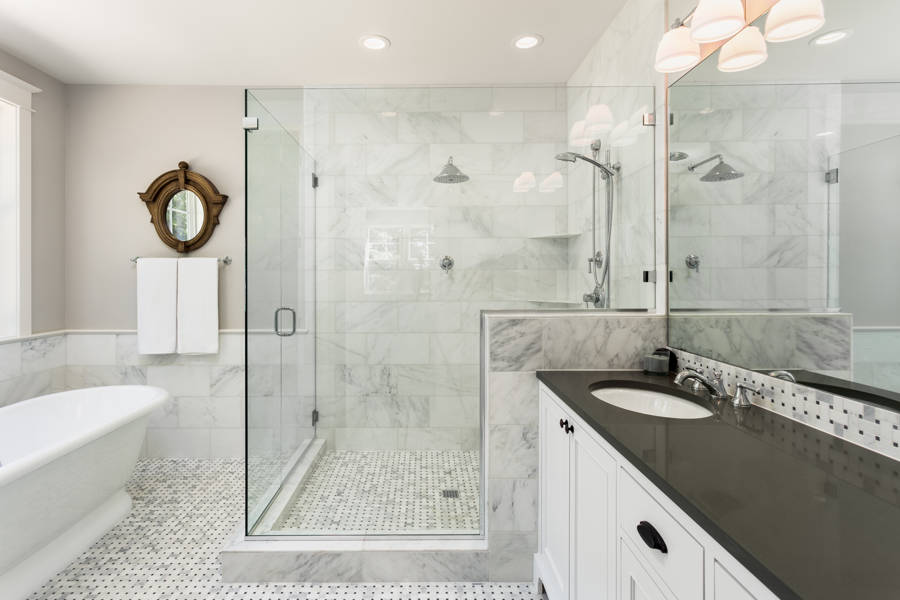
Ventajas de aplicar microcemento sobre azulejos
1. El microcemento se aplica sobre los azulejos existentes sin obras
The main benefit of microcement is its excellent adherence and compatibility with all types of materials, including tiles, which is the topic we are dealing with today. In this way, the microcement is applied directly on the tiles without the need to remove them.
Esto provoca que no sea necesario realizar obras para derribar los azulejos y, al no tener que desescombrar no se generan residuos con el consecuente ahorro de tiempo y de molestias, tanto para el dueño de la casa o del local como para los vecinos y vecinas.
2. El microcemento sobre los azulejos moderniza las habitaciones
Also, by applying the microcement on the old tiles it modernizes and quickly transforms the spaces completely changing the design of the rooms. Multiple finishes are possible thanks to the extensive variety of textures, varnishes and colors of microcement available.
3. Possibility of non-slip and waterproof finishes of microcement on tiles
Algunos tipos de microcementos de última generación confieren por sí mismos acabados antideslizantes que son de gran utilidad, sobre todo cuando se apuesta por el microcemento alisado para renovar los azulejos del suelo del baño o los azulejos del suelo de la cocina.
Es el caso de algunos de los microcementos quefabricamos en Topciment,that guarantee continuous non-slip pavements where falls and slips have no place. Although we also have varnishes and sealers that have these properties.
Otra ventaja de aplicar microcemento sobre azulejos antiguos, es que se pueden conseguir acabados impermeables. El baño, por ejemplo, es una estancia que sufre de manera constante la humedad ambiental y, por lo tanto, no sirve cualquier revestimiento decorativo.
At Topciment we have designed specific varnishes with which to seal the tiles of the bathroom wall or the tiles of the shower wall coated with microcement. Varnishes of the highest quality with which the smoothed microcement will perfectly resist environmental humidity and running water (not stagnant).
El microcemento es perfecto para revestir los azulejos del baño y cocina
As you have been able to verify, the advantages of applying microcement over tiles make this continuous coating the ideal one to cover the bathroom and kitchen tiles. Qualities to which must be added the easy maintenance and cleaning of the smoothed microcement.
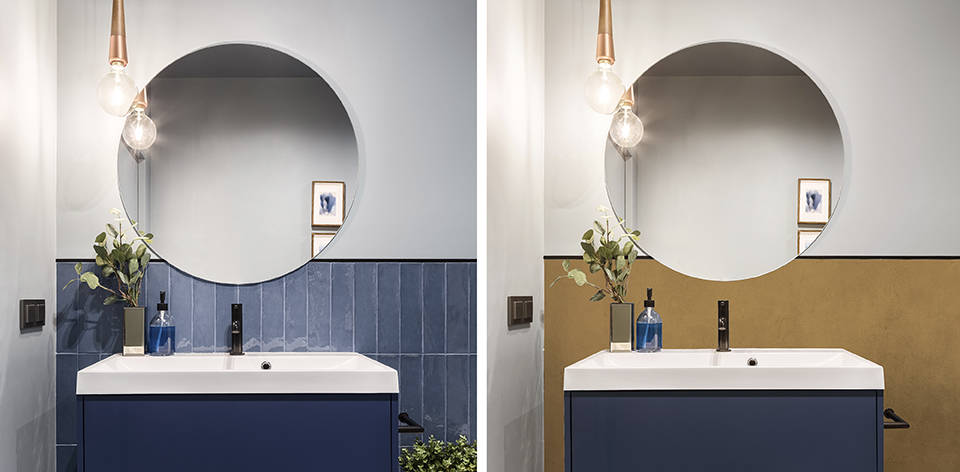
A continuación, les mostramos el antes y el después de algunas obras en las que se ha aplicado microcemento sobre azulejos antiguos.
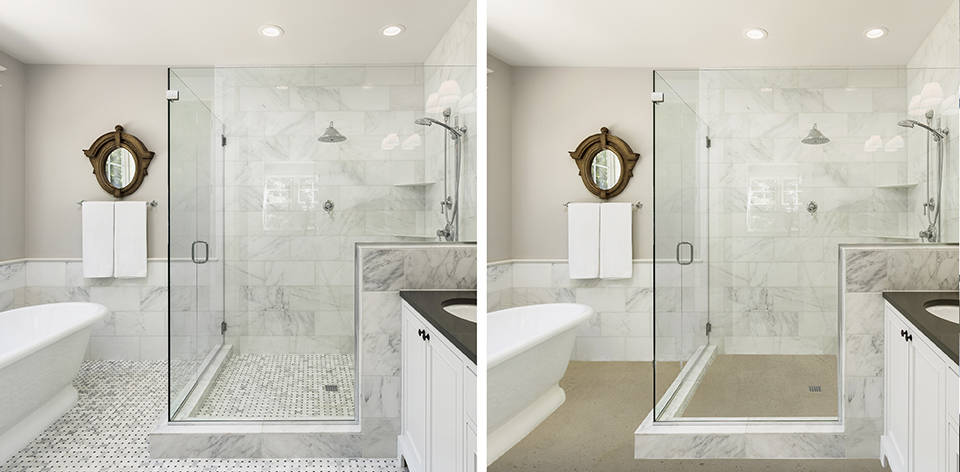
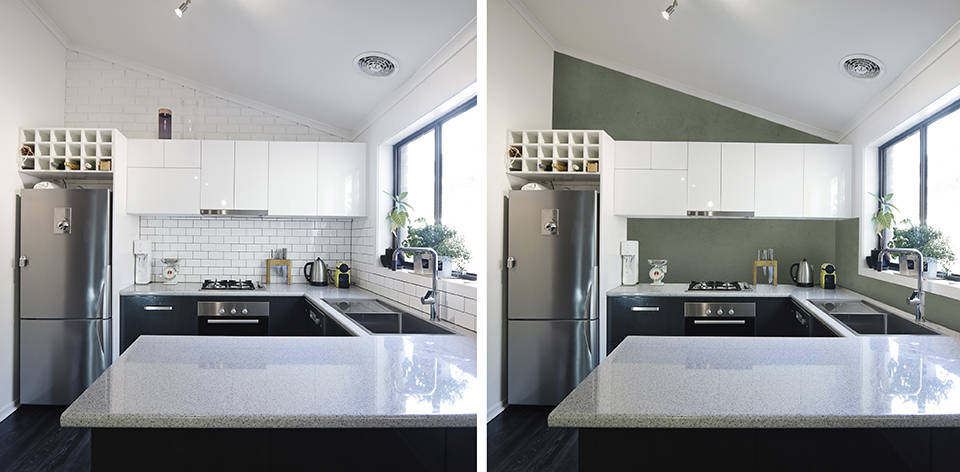
Renovating old tiles with microcement: application and tips
Para colocar microcemento sobre azulejos es esencial tener un aplicador profesional y calificado que haga un buen trabajo, como los instaladores de microcemento que trabajan con nuestros microcementos.
Just like that you won't have to regret algunos de los problemasmore frequent that are a consequence of errors in the application of microcement.
8 pasos para aplicar microcemento sobre azulejos
1. Evaluar estado de los azulejos
The first thing to do before applying microcement directly on old tiles is to check the condition of the tiles. Since if the tiles on the floor or wall have any imperfections, they cannot be coated with microcement as if nothing. The substrate will need to be repaired before placing our smoothed microcement. Hence the importance of the renovation being carried out by a professional, because they will know how to locate these defects.
2. Limpiar los azulejos antes de aplicar microcemento
Después de reparar los azulejos, en los casos que sea necesario, hay que limpiar a fondo los azulejos antes de aplicar microcemento alisado para que no haya grasas ni polvo.
3. Rellenar con microcemento las juntas de los azulejos
Una vez que la pared o el piso donde se encuentran los azulejos estén limpios, es hora de ponerse a trabajar. El primer paso propiamente dicho de la aplicación de microcemento sobre azulejos consiste en rellenar las juntas. Dado que el microcemento alisado es un revestimiento continuo y, por lo tanto, si no se rellenan las juntas de los azulejos, el soporte que hará de base no será estable y habrá desniveles que marquen las juntas.
4. Imprimar los azulejos que van a ser revestidos con microcemento
When the surface is level and the tile joints are perfectly filled, it will be time to apply the corresponding primer or adhesion promoter. A fundamental product since it serves as a bridge between the tiles and the microcement, so that the latter adheres better.
En Topciment hemos fabricado una amplia gama de imprimaciones dependiendo de la superficie donde se aplica el microcemento. En este caso, que se trata de azulejos, nuestros expertos recomiendan usar uno de estos dos: Primapox®100 Barrier o Primacem Plus. Vamos a explicar ambos para que sepas cuál usar en cada ocasión.
Primapox®100 Barrier A + B es nuestra imprimación epoxi antihumedad que bloquea la humedad por capilaridad y actúa como barrera de vapor. Un promotor de adherencia 100% sólidos y bicomponente que es perfecto para los azulejos de la pared de la regadera o los azulejos del piso del baño. Un innovador producto que, además, evita el calcado de las juntas en el microcemento.
On the other hand, you can also use Primacem Plus, our specific primer for non-absorbent surfaces such as tiles and which is applied in a single hand.
5. Place fiberglass mesh in the first layer of microcement over tiles
Después de dejar las horas de secado pertinentes (ver fichas técnicas), colocaremos la malla de fibra de vidrio sobre los azulejos antes de aplicar el microcemento para proteger el futuro revestimiento y evitar fisuras, grietas, etc. Un paso que no todo el mundo tiene en cuenta y que después se convierte en un gran dolor de cabeza.
Immediately afterwards, the first layer of base microcement (Microbase) without pigment will be applied over the tiles. Once the tiles are well covered by the microcement, without irregularities, the support will be sanded.
6. Apply second layer of microcement base on the tiles
Apply the second layer of microcement base (Microbase). This time it will have to be pigmented with the color of microcement that has been chosen to cover the old tiles. In the same way as in the previous step, the surface will have to be sanded.
7. Apply two layers of Microdeck or Microfino microcement on tiles
After the base microcement, two layers of Microdeck microcement or two layers of Microfino should be applied over tiles. The former is usually used for floors and the latter for walls. Although depending on tastes, preferences and finishes sought, combinations can be made. Both hands will already be pigmented. Then, sand.
8. Proteger y sellar el microcemento sobre azulejos
The last step is one of the most important. It's about protecting the microcement coating over tiles. For this, we have all kinds of varnishes and sealers. Although on this occasion, we recommend using two coats of Presealer and another two coats of Topsealer WT One Coat
Tips and recommendations for covering tiles with microcement
1. Respetar tiempos de secado
En el caso de usar una imprimación para superficies no absorbentes como Primacem PLUS, es muy importante que cuando se cubra con microcemento los azulejos respetar el tiempo de secado. Si no se siguen al pie de la letra las indicaciones y tiempos de secado especificados en las fichas técnicas, quedarán humedades atrapadas entre capas y por lo tanto se marcarán las juntas de los azulejos.
Con este consejo evitarás cometer el error más común al aplicar microcemento sobre azulejos. Un posible error que se evita al utilizar la imprimación Primapox®100 Barrier, para la que no es necesario ser tan meticuloso con las horas de secado debido a su capacidad de bloquear la humedad por capilaridad.
2. Dejar secar 24 horas antes de aplicar la segunda capa de microcemento
Another recommendation from Topciment experts, in the case of also using Primacem PLUS, is to leave a period of 24 hours of drying between the first and second layer of microcement base.
Un proceso que no todos hacen ya que no es obligatorio, pero con el que el profesional se asegura que haya muchas menos probabilidades de que se marquen las juntas por un error en la aplicación del microcemento sobre azulejos. Con Primapox®100 Barrier se hará con el sistema normal. Es decir, aplicando la segunda mano de Microbase inmediatamente después de la primera.
3. Imprimar los azulejos antes de aplicar la segunda capa de microcemento
We also recommend that 24 hours after applying the first coat of microcement, more than enough time for it to have dried properly, re-prime the microcement that coats the tiles with Primacem PLUS.
A piece of advice aimed only at the most expert applicators and thanks to which it will be achieved to equalize the level of absorption of the next applications of microcement on tiles. An equality with which the visual marks of the joints that have different absorption points are drastically reduced.
Suscríbete a nuestro boletín informativo
Receive in your email tips for the application and care of microcement, the latest trends and news from Topciment products.


